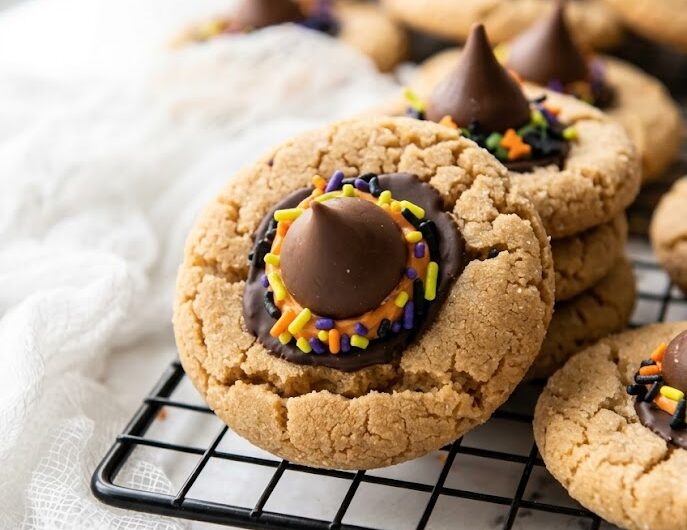
These peanut butter witch hat cookies come out soft in the center with a slight crisp edge, and that chocolate top sets into a smooth shell. The flavor leans nutty and sweet without being heavy, and the mix of peanut butter, butter, and chocolate gives each bite structure. From mixing to decorated cookies, you’re looking at about 55 minutes total.
This version builds on the classic peanut butter blossom idea, but swaps the usual bake-and-press method for a layered approach using melting wafers. Instead of pressing a chocolate kiss directly into hot dough, you spread melted chocolate first, which is what creates a stable base so the kiss sits cleanly without sinking or tilting.
The one detail that decides how these turn out is when you add the chocolate wafer. It needs to go on right after baking so it softens without fully melting, because if it liquifies too much it spreads too thin, and if it stays firm it won’t bond. That balance is what gives the hat brim its shape and grip.
These cookies use a simple peanut butter dough topped with melted chocolate and finished with decorated kisses, with most of the time spent on cooling and setting rather than baking.
Witch Hat Cookies
Course: Dessert30
servings15
minutes10
minutes202
kcalChewy peanut butter witch hat cookies topped with smooth chocolate wafers and chocolate kisses. Easy, festive, and ready in 55 minutes!
Ingredients
Cookies:
1 ¾ cups (218 g) all-purpose flour
1 teaspoon baking soda
¼ teaspoon salt
½ cup (100 g) granulated sugar, plus extra for rolling
½ cup (100 g) light brown sugar
½ cup (128 g) no-stir creamy peanut butter
½ cup (113 g) unsalted butter, room temperature
1 large egg, room temperature
1 teaspoon vanilla extract
30 chocolate melting wafersFrosting:
½ cup (113 g) unsalted butter, room temperature
1 ¼ cups (150 g) confectioners’ sugar, sifted
1 teaspoon vanilla extract
Pinch of salt
1–2 tablespoons heavy cream or whole milk
Gel food coloring (orange, purple, green)Decoration:
30 chocolate kisses, unwrapped
Sprinkles
Directions
- Cookies
- Preheat oven to 375°F. Line a baking sheet with parchment paper.
- Whisk together flour, baking soda, and salt in a medium bowl.
- Beat granulated sugar, brown sugar, butter, and peanut butter until light and fluffy, about 2 minutes. Add egg and vanilla, then mix until combined.
- Add dry ingredients on low speed and mix just until combined.
- Scoop dough into 1-inch balls, roll in sugar, and place 1½ inches apart on the baking sheet. Press slightly.
- Bake for 10 minutes until lightly golden. Immediately press a chocolate wafer on each cookie, let it soften, then gently spread slightly with the back of a spoon.
- Transfer to a wire rack and cool completely.
- Frosting and Assembly
- Beat butter until creamy, about 2 minutes. Gradually add confectioners’ sugar on low speed until fully incorporated.
- Add vanilla, salt, and 1 tablespoon cream, then mix until smooth. Adjust consistency as needed.
- Divide frosting into bowls and tint with gel food coloring.
- Pipe frosting onto the base of each chocolate kiss, then press onto the set chocolate layer. Add sprinkles if desired.
Notes
- Use no-stir creamy peanut butter for best texture.
- If melting wafers are unavailable, melt chocolate and spoon it onto cooled cookies.
- Store in an airtight container at room temperature for up to 1 week.
- Freeze dough or baked cookies for up to 3 months.
FAQ
Why do my chocolate wafers not spread evenly on top?
They don’t spread evenly if the cookie surface cools too much before adding them, because the heat is what softens the chocolate just enough to move. You should press the wafer on within seconds of removing the tray from the oven. If needed, gently nudge it with the back of a spoon to widen it slightly.
Can I use regular chocolate instead of melting wafers?
Yes, but it behaves differently because standard chocolate melts thinner and sets less evenly. Melting wafers are designed to hold shape after softening, which is why they work better for the brim. If using regular chocolate, spoon a thicker layer and let it set fully before adding the kiss.
Why did my cookies spread too much in the oven?
They spread too much if the butter is overly soft or the dough is too warm, which weakens the structure before baking sets it. Chilling the dough briefly helps keep the shape tighter. Also measure flour correctly so the dough has enough body.
How do I get the chocolate kiss to stick properly?
The kiss sticks because the frosting acts as both glue and decoration, holding it in place once it sets. If the chocolate base is still too soft, the kiss can slide or tilt. Let the wafer layer firm up before piping frosting and pressing the kiss.
Can I make these cookies ahead of time?
Yes, they hold well because the structure is stable once everything sets, especially the chocolate layers. Store them in an airtight container at room temperature for up to a week. For best texture, add the frosting and decoration the same day you plan to serve.
Why is my frosting too thick or too runny?
The texture depends on the balance between sugar and cream, because small changes shift the consistency quickly. Add cream in small amounts to loosen it, or more sugar to thicken it. You’re aiming for a pipeable texture that holds shape without dripping.